Tuesday, April 20, 2021

Final Task CCR

Critical Reflection

This my critical reflection for our final task. I decided the paint while simultaneously answering questions about the film. My interviewer is Kyndell Baskin, my cousin and she asks me some very good questions regarding the filmmaking process and what impacts it may have on an audience. I hope you all enjoy the video and my painting!


Friday, April 16, 2021

Final Task: INSANITY

Our Film

INSANITY

by Kassandra Davis, Gabriella McFarlane and Courtnie Williams

This our project! Through trials and tribulations, we've finally finished! I hope you enjoy our film and are able to see our growth as young producers. Our film is about a young lady, Jenna, who intends on meeting her grandparents for the first time but she walks into the home of a psycho. Her mom seems to be not telling her something, I wonder what it is... 

Thursday, April 15, 2021

Editing Blog: Doing Our Title Sequence

Editing Blog

Now that editing of the film is all done, we must add our credits. I would just like to mention how much of a struggle this was. This took the entire day to complete and through so many trial and errors, we finally got it right. We used a different editing app to create our title sequence, instead of VideoLeap, we switched to a very beautiful app called Videostar. The reason I switched apps was because VideoLeap doesn't have a sufficient font section like Videostar, when it comes to custom coloring, setting durations and the fonts. I copied our title sequence draft that we worked on a couple blogs back. I added our production company and the movies title just like we did before. One thing different about this part, was putting the movie title on the film instead of a black screen. I had to reproduce the way the colors faded and how fast they'd come and go. This want that looked like:

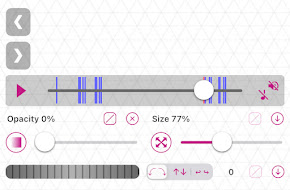
The next part was adding credits to the actors and crew, which was just alternating between the bottom left and right of the screen. The process is pretty difficult to explain but I'll try. The hard part was getting the placement balanced and timing their appearance correctly. I multi-layered the video, then picked where I wanted the titles to appear, then added the title a second before that timing. The for the first timing I lowered the titles opacity all the way down and turn it back up again that the time I chose prior. I reversed this process to exit the titles. I chose a placement two seconds after the title appears so the title would be readable. Then a second after, add another placement and lower its opacity to zero again. This is an example of how the processed looked in the app:


I repeated the procedure over and over and over again. I did it about seven time but it felt so much longer than that. Sometimes I had to start all over to fix a mistake that was made in the video or the fix a certain title and its placement. One issue with this app is, after you create the video, you can't go back to fix it. If you absolutely need to, you would have to redo the entire video. I believe I had to do this at least two times, which is two more than I wish I would have had to do. But it all good because it turned out beautifully. This was the last and finally touch to our film which means, WE'RE ALL DONE! Fun fact: in order to get the placement and timing right, I used a calculator to get an exact number. Who would have known you needed math to produce a film. 

Examples of how the credits appeared on the screen:


Monday, April 12, 2021

Editing Blog: Almost Done with Editing

Editing Blog

We are super close to being done, we're just waiting for me to finish all the editing. There are two very minor things that I worked on. Those two things were adding background music and prepping space for our title sequence. In my opinion, the background music is the most important part, as it would determine the genre of our film. It was the other group members jobs to find music the music, then my job to add in the film. We looked through a couple of the suggested websites to find free non copyrighted music. Honestly, we didn't have too much luck with finding good enough, free music. So we abandoned the idea of downloading music from a website. So I resorted to screen recording free, usable music on YouTube, unlinking the audio, and adding it to the film. The audio was easier to find and far more easier to add to the film. The music is credited to InnerPeace on YouTube. 


The scenes in the film are all done and edited so I saved the video, then added the music. Before I added the music I split the scene where I wanted to the music to start. Then I added the music where ever the scene started. The music starts after that transition between Jenna conversation scene and her arrival at grandparents' house. The music subtly plays in the background up until she enters the home with the psychopath, at that point the music heightens in volume. So I did another split between that section and turned up the volume. In the end, this is how that looked in the app:

The last thing I did was add two, two second clips of a fading black screen at both ends of our film. Those black screens will be occupied by our title sequence which is the very last portion of our editing process. After that we're all done!


Thursday, April 8, 2021

Editing Blog: Adding Non-Diegetic Sound

Editing Blog

Today was round two of editing. I worked on editing our second and third scene. These are also the last two portions of our film. First, I had to cut, trim and merge the section of Jenna arriving at the home. This process was nearly identical to how I edited the first scenes. I did an action match for the shots of Jenna's arrival and her getting out of the car. One issue we ran into was the audio of the line "I think this is it... here goes nothing." Considering, we filmed this scene outside when it was windy, you can definitely hear an overwhelming sound of wind heating the camera's mic. There wasn't much I could do to fix it, reshooting would not change the fact that we've had a never windy week. So as the editor, I decided to best option was improving the volume as much as possible. I simply lowered the volume on this particular scene. Though it isn't perfect it's no longer a weird distraction in the film. Coincidentally, I had to turn the volume up on the scene prior to this one. This is was that looked like:

    
As a default, the volume starts at 100. For the quiet scene, I turned it up to 109 and lowered the other scene to 61. Another editing technique I used was adding non-diegetic sound. It was used to cover sound effects that would not have been picked in properly in the film. These sounds were the sound of Jenna's call dropping when she loses signal and the knock on the grandparents door. We actual planned to use do this which I'm super impressed by; the fact that we took that into consideration prior to film was smart on our part. A simple YouTube search provided me with these non-diegetic sounds. I screen-recorded the videos and unlink them in our editing app, then placed them on the needed section of the film. This is want the looked like, the audios bordered with white, is the non-diegetic sounds:


the first one is the sound of the phone call dropping and the second one is the knock on the door. For both of these I lowered the volume, as you can see, so they weren't too loud and unrealistic. 

Monday, April 5, 2021

Editing Blog: Overlapping Dialogue

 Editing Blog

I worked on editing scenes 1-7 today. This is the first day, I've gotten a chance to edit our film. I skipped to merging the conversation shot/reverse shot scene which goes back and forth between Jenna and Mom. I had to go through all the footage and pick out what was usable. Then I trimmed the videos so I wouldn't lose the section. The clipped the videos together and trimmed them so they'd flow as smooth as possible. For the most part I followed the storyboard but some angles were replaced. For the record, I recorded an extra angle which was a close-up on Mom's left side. I replaced our normal close-up with that extra shot, not a huge difference but an example of replacing certain angles. 

Listening to the clips, I noticed the major difference in sound quality. This was expected considering one is outside and the other is surrounded by home appliances. As quiet as we tried to get the set, you could still here a little background sounds. You could also hear the difference in sound volume. This is due to the actors distinctive tone of voice and particular acting. To fix this, I first tried to match the volume of the separate scenes. 

I tampered with the audio's volume and decided what sounded good. This took a lot of tries and configuration. Even after I thought I was done with editing, I went back to tamper with the audio. In addition to tampering with audio, I did a couple audio overlays. Never thought I would've needed to do this but it made sense in the end. Overlaying audios helped make the scene and audio flow. Majority of this portion of our film acquires the dialogue to overlay certain scenes. Well, now that I think about it, overlapping the dialogue for action matches makes all the sense in the world. To do this I had to unlink the audio from video and place it on top of the videos clipped together. This is what that process looked like in the end:


Thursday, April 1, 2021

Editing Blog: Drafting Our Title Sequence

Editing Blog

Now that we've filmed, we're starting to began our editing process. The first part we tackled was our title sequence. We already had a plan for how we wanted it to look so all we had to do was follow suit. I did the draft for the title sequence and met with Kassandra to see if she liked it or not. 

At first I did no idea how to pull it off but I had a random memories of an app called Videostar. This is a mobile editing app that I haven't had a ton of practice with. I used because it was the only familiar app that I knew could create the sequence. The first thing I worked on was getting the movie title to transition colors. We planned for the title to appear yellow and fade into a black shadow. We kept the same concept but decided on fading the title into red instead. I did this by creating two masks, one was yellow, one was red.


I overlayed the two text then set a duration for the fading. The yellow fades first to create that transitioning color effect. I can admit, setting durations for the fades was the most difficult part. Only because it took the most amount of time and manually doing it caused for precision. That was honestly one of the hardest parts of our title sequence. Aside from the movie title, we also changed all the titles to the analog font. We initially planned for the rest of the titles to use Euphemia UCAS Italic but we liked how the Analog looked on the screen.Next step was drafting other essential titles that would display at the beginning of the film. Things I practiced for was timing, fading and placement. I practiced with our "studio" name. The named we're using is "StudioHome" and it'll show as "StudioHome presents." I set durations for the fading of this message, it does come and go a little fast but we think that would be necessary for a two minute film. Last thing I drafted was how we'd present our actors names. They will appear yellow just like the rest of the titles and fade away. As you can see all the titles have the same procedure. The actors names will appear at the bottom of screen, alternating between the left and right side. 

Here's the complete draft:


I should also add that we do not intend on displaying the titles on a black screen. The exact time we showcase our first scene so will the movie titles. Also, this draft is rough and is not the final product, timing and placement will be perfected in the actual film.


Final Task CCR

Critical Reflection This my critical reflection for our final task. I decided the paint while simultaneously answering questions about the f...